In today’s fast-paced work environment, ensuring employee comfort and safety is paramount. Ergonomic practices not only help prevent musculoskeletal disorders but also enhance productivity and overall job satisfaction. This article explores the services offered to evaluate and improve ergonomics in the workplace, as well as practical tips for setting up your workstation effectively.
Ergonomics Services Overview
Detection, Correction, and Prevention
Organizations can take proactive steps to identify and mitigate work-related musculoskeletal disorders (MSDs). Our dedicated ergonomics services include comprehensive worksite analyses, expert consultations, and training tailored for all employees. To initiate this process, simply submit a request through your supervisor or district coordinator.
Worksite Evaluations: Office Ergonomics A thorough worksite evaluation typically lasts between 20 to 40 minutes and involves an in-person assessment of an employee’s workstation. A Risk Consultant representative will examine the setup, sharing the fundamentals of office ergonomics while making necessary recommendations. Following the evaluation, a written report will be provided to both the employee and their supervisor. Should any adjustments require new equipment, it is the responsibility of the relevant department to provide these items. The focus is primarily on modifying existing workstations in a cost-effective manner. To get started, don’t hesitate to reach out to your Risk Consultants.
Helpful Ergonomics Tips
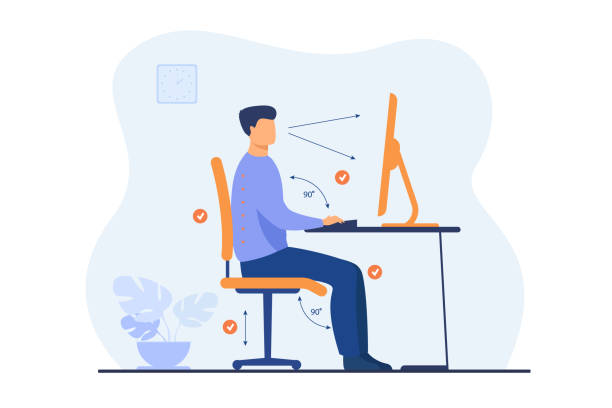
Setting Up Your Workstation:
Whether you’re a new employee or transitioning to a different workstation, here are crucial ergonomic principles to guide you through an optimal set-up:
Chair Setup
1. Height: Adjust your chair height so the seat is just below your kneecaps, allowing your feet to rest flat on the floor.
2. Back Support: Ensure the lumbar pad supports the natural curve of your lower back while allowing for a slight recline of about 110 degrees.
3. Seat Tilt and Depth: Adjust seat tilt to enhance comfort and ensure the seat doesn’t press against the back of your knees. A five-degree tilt is generally recommended.
4. Armrests: Armrests should support your forearms without hindering your ability to pull the chair close to the desk. Consider gel wraps for added comfort.
Keyboard
1. Keyboard and Pointing Device Height: Position your keyboard 1 to 2 inches above your thighs, ensuring shoulder relaxation and elbow angles between 100° and 110°.
2. Keyboard Tilt and Position: Adjust the keyboard tilt according to your seating position and maintain shoulder-distance between your keyboard and mouse, keeping them level.
Computer Monitor
1. Monitor Distance: Place your screen at least an arm’s length away, adjusting for personal vision needs; the top of the monitor should be just below eye level.
2. Reduce Glare: Position the screen to minimize glare from windows and lights using various techniques, including adjusting blinds or using glare filters.
Telephone Placement
1.Ensure that your telephone is easily accessible to reduce neck strain. If you frequently use the phone, consider a headset to maintain ergonomic posture.
Rest Breaks
Rest is a key component in ensuring the performance of the musculoskeletal system. Frequent breaks can decrease the duration of a task and help lower risk of injury. Avoid extended periods of work during continuous tasks by taking short breaks (~2 min) or by working in task rotations. Take microbreaks (approximately 30 seconds to 1 minute) every 20 minutes to rest the upper and lower extremities, back, neck, and eyes. Consider light stretching every hour or as needed.
By investing time in setting up an ergonomic workstation, organizations can foster a healthier, more productive work environment. With the right ergonomic practices and resources, employees can anticipate enhanced comfort and reduced risk of injuries, leading to a happier and more efficient workplace. For assistance with ergonomics evaluation and training, reach out to your Risk Consultants today at RiskServices@psesd.org.
Helpful Links
UW Ergonomics Website
OSHA Ergonomic Assessment Checklist
Ergonomic Help from L&I for Office Workers